- Joined
- Sep 10, 2009
- Location
- Blackpool, United Kingdom
my mates just sprayed some technics up, he's done a step by step, sure he won't mind me sharing it with ya. might come in useful if anyones feeling adventurous or simply interested/needing refernce for the innards of the deck.
heres his step by step with pictures.
------------------------------------------------------------------------------------------------------------------------------------
Just bought a pair of battered old decks of a friend for 200 quid, so I thought I would give them a bit of TLC and get them looking better than new. I thought I would post how I did it here so if anyone else is feeling adventurous they can see how to do it. If you do decide to do this, make sure you have some understanding of electronics and how to handle them. There is a chance that you may ruin your decks, and its not my fault if you make a mess of them.
Here is one of the beasties -

Both decks had broken tone arm clips, battered platters, broken target lights and looked a just a little tired. They work absolutely fine though.
First thing to do is to take the back rubber cover off. To do this you need to turn the deck upside down without breaking the tone arm. Some people like to use the dust covers for this, but since mine didn't come with any, I improvised with some Charles Dickens books I had on a book shelf.


Once upside down there is about 20+ screws to remove. You will need to remove the 4 rubber feet as there is 4 long screws hidden under them.

Once you have the screws out, carefully remove the rubber base to reveal the back of the chassis. You will have to remove the power plug to do this.

There is about 5 screws to remove from the back of the chassis then carefully lift the back off.

Now carefully flip the deck back over and remove the platter and the dust cover.

You should see 3 black plugs that go into the boards from the pich control, target light and power switches. You will need to carefully detach them from the board and also snip the cable ties holding them together.
Now you can flip the deck on its side and start removing the power switch assembly. You need to remove the 3 black screws, as well as the gold and rd screws holding the circuit board in place. You don't have to remove the board, just the screws. There is also a little screw holding the power switch in place.

You should be left with something like this -

Now remove the 2 screws holding in the target light, and the 2 screws holding in the pitch slider and remove them. Don't forget to remove the tag holding the grounding wire for the tone arm. Remove the 3 screws holding the tone arm and carefully remove it from the chassis.

I forgot to take a picture here, but turn the deck back over and remove the 3 screws on the main board, the 3 screws on the motor, the 2 screws on the fuse board, 3 screws on the transformer, 2 screws on the power lead, and 2 screws on the heat sink. You should now be able to lift everything out in one. Be careful when lifting the main board as the spindle might stick to it but it is not attached.

Look at the dirt in that! Now remove the target light trim and the little metal trim with the pitch decals on. You will destroy this in the process so make sure before you start that you can source some more. I got some for £5 each. You also need to remove the cloth on the underside. You can do this carefully so you can reuse it later. Remove the sticker and give it a good clean.

Something that you may want to do during the disassembly is to put the screws for each part in a separate bag and label them. This makes re-assembly a lot easier and gets rid of the "remaining screws syndrome" at the end.

ow comes the painting. For a good paint job, proper preparation is vital. If you are unfamiliar with spraying techniques I strongly advise you take your chassis to a car body shop and get them to do it all for you. They shouldn't charge you that much. I decided to do all the prep at home and let a spray painter apply the topcoat.
You will first need to scuff back the powder coating and repair any deep scratches with a fine stopping putty. I rubbed it back with P320 production paper, and used red scotch brite on the awkward places. Be careful to not go through the powder coat if possible. If you do get rub through's to the bare metal, don't worry we will sort that next. You should now have something looking like this -

Now degrease thoroughly and use some acid etch primer on the rub through's.

ow carefully sand back etch primer and apply a decent high build primer. I use U-Pol aerosols because I know they work. You can buy cheap ones but sometimes its just not worth it.

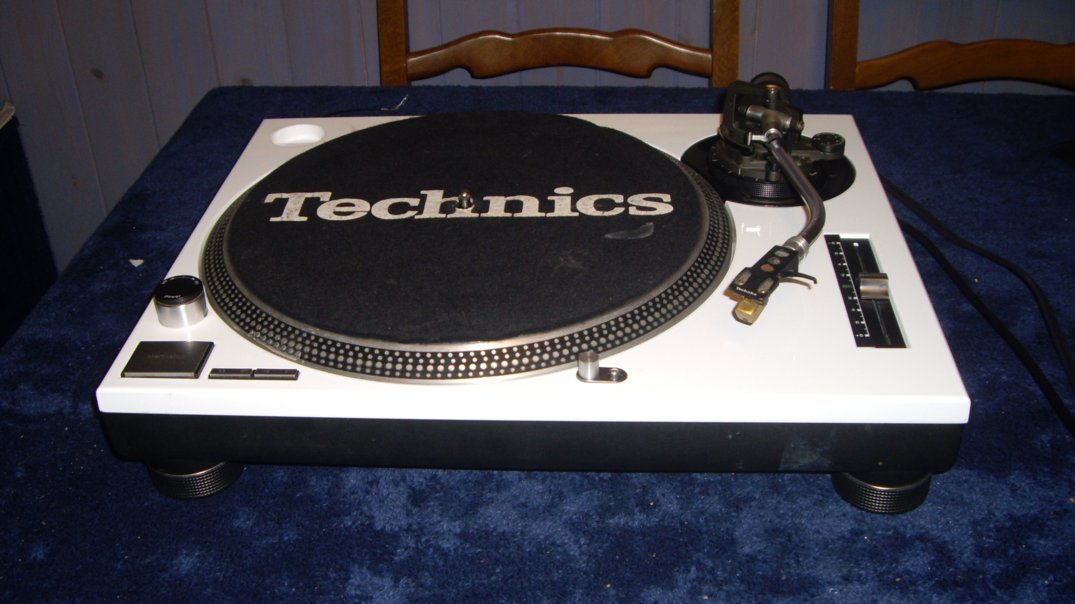
I now wet sanded the primer with P600 wet or dry paper being careful not to rub through. I then gave it to the spay painter to finish. I had it finished in a high quality automotive 2 pack in a fetching Ford colour called Frozen White.

Looking good! Now its time to reassemble! Place in the spindle and replace the innards

Time to add the new decals

The rest is pretty straight forward, just do the reverse of the disassembly. I also replaced the target light and the broken clip. I still need to polish up the platter, but that can wait until another day.
And here is is -


Now repeat the whole thing again to complete the set

heres his step by step with pictures.
------------------------------------------------------------------------------------------------------------------------------------
Just bought a pair of battered old decks of a friend for 200 quid, so I thought I would give them a bit of TLC and get them looking better than new. I thought I would post how I did it here so if anyone else is feeling adventurous they can see how to do it. If you do decide to do this, make sure you have some understanding of electronics and how to handle them. There is a chance that you may ruin your decks, and its not my fault if you make a mess of them.
Here is one of the beasties -
Both decks had broken tone arm clips, battered platters, broken target lights and looked a just a little tired. They work absolutely fine though.
First thing to do is to take the back rubber cover off. To do this you need to turn the deck upside down without breaking the tone arm. Some people like to use the dust covers for this, but since mine didn't come with any, I improvised with some Charles Dickens books I had on a book shelf.
Once upside down there is about 20+ screws to remove. You will need to remove the 4 rubber feet as there is 4 long screws hidden under them.
Once you have the screws out, carefully remove the rubber base to reveal the back of the chassis. You will have to remove the power plug to do this.
There is about 5 screws to remove from the back of the chassis then carefully lift the back off.
Now carefully flip the deck back over and remove the platter and the dust cover.
You should see 3 black plugs that go into the boards from the pich control, target light and power switches. You will need to carefully detach them from the board and also snip the cable ties holding them together.
Now you can flip the deck on its side and start removing the power switch assembly. You need to remove the 3 black screws, as well as the gold and rd screws holding the circuit board in place. You don't have to remove the board, just the screws. There is also a little screw holding the power switch in place.
You should be left with something like this -
Now remove the 2 screws holding in the target light, and the 2 screws holding in the pitch slider and remove them. Don't forget to remove the tag holding the grounding wire for the tone arm. Remove the 3 screws holding the tone arm and carefully remove it from the chassis.
I forgot to take a picture here, but turn the deck back over and remove the 3 screws on the main board, the 3 screws on the motor, the 2 screws on the fuse board, 3 screws on the transformer, 2 screws on the power lead, and 2 screws on the heat sink. You should now be able to lift everything out in one. Be careful when lifting the main board as the spindle might stick to it but it is not attached.
Look at the dirt in that! Now remove the target light trim and the little metal trim with the pitch decals on. You will destroy this in the process so make sure before you start that you can source some more. I got some for £5 each. You also need to remove the cloth on the underside. You can do this carefully so you can reuse it later. Remove the sticker and give it a good clean.
Something that you may want to do during the disassembly is to put the screws for each part in a separate bag and label them. This makes re-assembly a lot easier and gets rid of the "remaining screws syndrome" at the end.
ow comes the painting. For a good paint job, proper preparation is vital. If you are unfamiliar with spraying techniques I strongly advise you take your chassis to a car body shop and get them to do it all for you. They shouldn't charge you that much. I decided to do all the prep at home and let a spray painter apply the topcoat.
You will first need to scuff back the powder coating and repair any deep scratches with a fine stopping putty. I rubbed it back with P320 production paper, and used red scotch brite on the awkward places. Be careful to not go through the powder coat if possible. If you do get rub through's to the bare metal, don't worry we will sort that next. You should now have something looking like this -
Now degrease thoroughly and use some acid etch primer on the rub through's.
ow carefully sand back etch primer and apply a decent high build primer. I use U-Pol aerosols because I know they work. You can buy cheap ones but sometimes its just not worth it.
I now wet sanded the primer with P600 wet or dry paper being careful not to rub through. I then gave it to the spay painter to finish. I had it finished in a high quality automotive 2 pack in a fetching Ford colour called Frozen White.
Looking good! Now its time to reassemble! Place in the spindle and replace the innards
Time to add the new decals
The rest is pretty straight forward, just do the reverse of the disassembly. I also replaced the target light and the broken clip. I still need to polish up the platter, but that can wait until another day.
And here is is -
Now repeat the whole thing again to complete the set
